
| Making A Lamp |
|
Why This Page Exists This page has not been written as detailed instructions for making a lamp. We are simplifying the process by showing the basic steps for make a stained glass lamp. There are no instructions showing you how to complete each step -- that is what Stained Glass Classes are for. If you are interested in learning how to accomplish each step yourself you can contact us (if you are local) or look for someone in your area who teaches the 'copper foil method' of doing stained glass. That said, let's start 'making' a lamp.
|
|
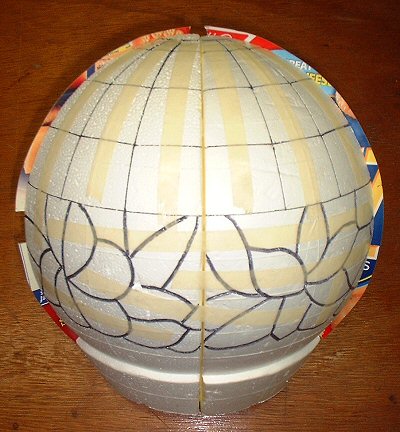
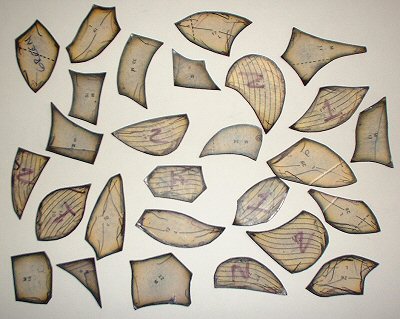
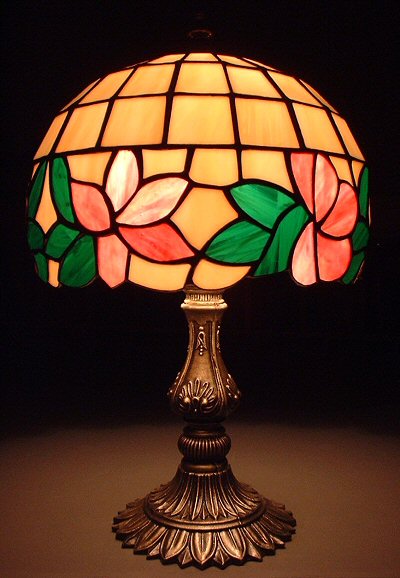
Geting Started You'll need a mold and a pattern along with your standard glass tools. Molds are generally made of styrofoam but the more expensive ones are made of fiberglass. These molds are rarely of the full lamp, but rather a section of it that needs to be repeated a number of times to make a complete lamp. In this example we'll be using two Worden G-11 molds which I've glued together. This will allow us to make our lamp in 3 sections (rather than 6) which we will then tack together to form one round lamp. Lamp molds can be used to make many different lamps depending on the pattern you use. The G-11 mold can be used in 6 different lamp designs. The patterns are all different but the mold they are made on is the same. We'll be making a Magnolia lamp here in this example. The Magnolia pattern consists of 180 pieces but there is a lot of gridwork (Repeated 'angled pieces') making the top half of this lamp. This is the mold and some of the pattern pieces used to make the lamp. (Click on pictures to enlarge):
|
|
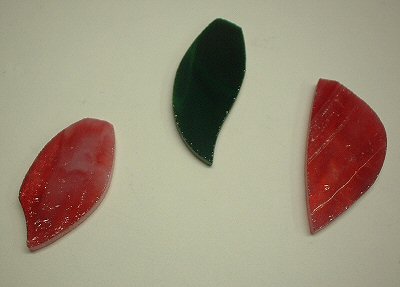
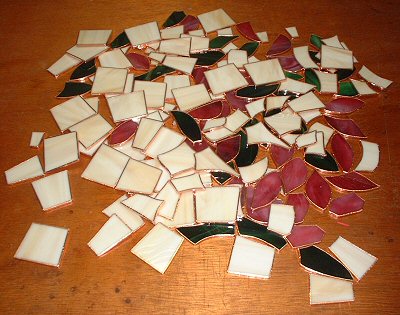
Bring On The Glass We'll be using 3 colors to make this lamp: a tan background, green leaves, and pink flowers. We sort our pattern and trace each of the pink flower pieces onto a pink sheet of glass, the leaves all get traced onto a green sheet and the background gets traced onto a sheet of tan glass. We cut out all the pieces using our cutter and pliers and then grind each piece of glass on a grinder so the sides are no longer sharp and it matches the pattern piece exactly. The picture on the left shows 3 unground pieces. You can see that although they resemble the paper pattern pieces, they are not perfect matches and have a few rough spots on them. The picture on the right shows the same pieces after we have ground them.

|
|
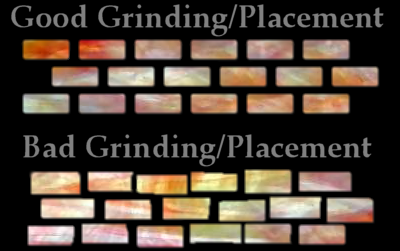
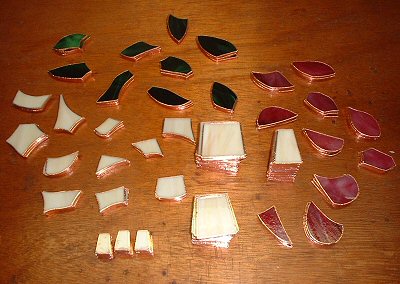
Cutting and Alignment Even if you are a skilled cutter and the pieces you've cut will fit correctly on the mold you MUST grind your pieces. The grinding roughs up the edge of the glass and allows the copper foil we will use in the next step to adhere firmly to our pieces. If you skip the grinding step the lamp would be weak and plyable -- You would be able to flex the finished lamp easily in your hands with just a liitle pressure. A lot of the stained glass lamps you see in stores skip the grinding step which means that the lamp is not sturdy at all. When this lamp is finished there will be no 'give' or 'flexibility' to it at all. Also, grinding helps make the pieces fit together much more perfectly. All the glass pieces used to make the lamp should line up evenly. Pay attention to the relatively inexpensive lamps you see in stores. They can sell them at this lower price because they've cheated by skipping important steps as they made the lamp. Once you know what to look for you'll be able to spot flaws easily.
|
|
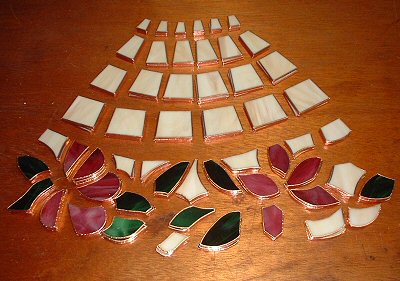
Using Copper Foil Now that the pieces have been ground to fit perfectly we need to wrap each piece with copper foil. The lead that we use to hold our lamp together won't stick to glass but it will stick to copper. The copper foil surrounds the edge of the glass and folds over slightly to the front and rear of the glass. Once wrapped all the foiled edges should be smoothed over with a wooden dowel or a 'FID' to ensure the foil is securely attached to the glass. This is another step that is ofen overlooked in the inexpensive lamps you can find in many stores today. Securing the foil to the glass adds extra strength to the finished project. When a lamp is finished it should be sturdy, not flexible or springy. Once a lamp that has not been ground begins to fall apart (and it will) there's nothing you can do but temporarily fix it. The picture to the left is of three pieces that have been foiled and then pressed to make sure the foil has adhered firmly to the glass. The picture to the right shows all of our 180 pieces ready to be set onto our mold and tacked into place.

|
|
Just Like Putting Together a Puzzle We need to sort our pieces to make it easier to place them on the mold. We do this by first sorting the glass by color and then by stacking identical pieces on top of each other. Although there are 180 pieces in the Magnolia lamp, there are only 34 different pieces used to make up the lamp. Most of these pieces are repeated 3 times but others (like the gridwork) are repeated 18 times. Once we have the pieces sorted we lay them out on the table to match the layout of the mold. You can see this in the right hand picture.
Next we place the pieces on the mold and tack them into place with lead (solder). You can attach the glass to the mold by using one of three methods. Since this mold is made of styrofoam you can use straight pins to hold the glass onto the mold but this requires an unbelievable amount of pins (up to 4 for each glass piece) and runs the risk of you soldering the pins to the actual lamp if you aren't careful. Our second choice is covering the mold with double sided tape which holds each piece of glass securely in place to the mold. Our last choice is using something called tacky-wax. The wax is melted in a small pot and brushed onto the mold leaving behind a sticky layer that the pieces will adhere to. I recommend NOT using pins. The wax is easiest method and also allows you to slide the pieces around on the mold easily for perfect placement but it leaves a wax coating in the finished lamp that has to be cleaned with Kerosene and can get very messy. I prefer to use wax, but on a small lamp like this we'll just use double sided tape. You can see the double sided tape is already on our mold in the first picture of this page.
|
|
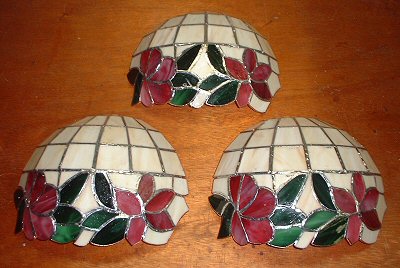
Tack it Together Once we have the pieces in place on the mold we use lead to hold it all together. The lead will not stick to the glass, that's why we had to wrap each piece with copper foil. It's the copper foil that the melted lead sticks to. We will cover all the copper foil that we see with lead, remove the first section of the lamp from the mold and then repeat the process 2 more times. The picture on the left shows the pieces placed on the mold and tacked into place. The right hand picture shows the sections after it has been removed from the mold.
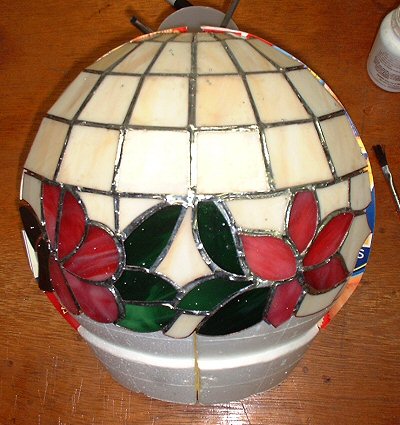
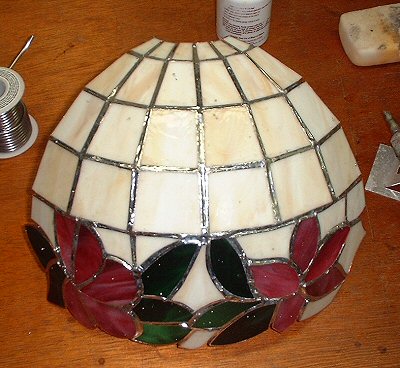
The lamp is fairly messy at this stage because it is covered in a chemical called flux. Flux is a mild acid that cleans the copper and helps the lead bond to it. If you don't flux your pieces you will have a hard time getting the lead to hold everything together. We now have three of the same sections of the lamp tacked (see left picture) and have to join them all together. We simply line up two pannels edge to edge, apply a little more flux and then solder them together. We then insert the last section of our lamp much the same way. If everything was cut correctly the last panel will more or less drop into place and all our lines will match up. If not we may need to reposition some pieces to fit which may involve melting out a piece or two or perhaps re-grinding some pieces. If you took your time cutting, grinding and positioning your pieces on the mold before tacking it you won't have any problems with your three sections fitting together. In this case out lamp joined perfectly without any problems. We add the cap to the top of the lamp by positioning it and then soldering it to any lead lines that touch it. Next we need to add a few 'bridge' pieces. Bridge pieces are parts of the lamp that overhang the mold and cut into the other sections. If there are no bridge pieces you would have 3 straight lines running from the top to the bottom of the lamp plainly revealing the fact that the lamp was made in 3 sections. Some lamps have no bridge pieces (mostly lamps involving geometrical designs), this lamp has 3 per section. Each bridge piece is easily held in place by hand and then soldered onto the lamp making a seamless pattern that wraps around without a visable start or end point.

|
|
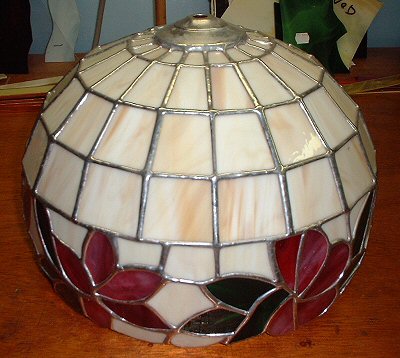
Soldering it Professionally Now that our lamp is together we need to do a final solder on it. This is an important (and often overlooked) step in making a lamp. What we've been doing so far with the lead is simply holding everything together without worrying what it looks like. The lead is flat and uneven on our lamp and there may even be sharp points here and there. What we are going to do now is smooth it all out by making a nice flowing bead of solder on every lead line on the lamp. This involves maneuvering the lamp so the line you are about to solder is level. Then we flow more solder onto the line creating a nice, smooth, rounded lead line. The lamp MUST be moved slightly for every line or your bead will not form correctly. This step is just as tedious as it sounds. Again, look at the lines of lead you see in discount stained glass lamps. Is the line flat, jagged and/or clumpy? This means the lamp was never properly finished (another omitted step to get the lamp out the door faster). It's like applying primer to a car you're working on and then deciding you like the color of the primer and not bothering to paint it. Sure you can skip that next step but it isn't correct and it will cause problems later on for the car (or in this case, the lamp). A smooth bead gives the lamp a finished look and also makes it much stronger. Because of this final soldering I have been able to guarantee all my lamps for the life of the lamp. I can guarentee that none of my lamps will ever fall apart as they hang above your kitchen table or sit on a base in your living room. I made my first lamp in 1980 and have made hundreds of lamps over the years. The only repair work I've had to do on any of them had to do with the lamp being dropped or hit by something. Meanwhile, I made a great amount of money repairing cheaply made store bought lamps that, over the course of 5 or 6 years, would slowly pull apart while sitting in a room undisturbed. Stained glass lamps have weight and pressure and if they are not soldered correctly gravity will slowly pull at them until they seperate and come apart. Here we see the lamp on the left is tacked together without a finished lead line. It's relatively sturdy (for now) and could technically be washed and ready for sale. The lamp on the right is the same lamp 1 hour later after it's been re-soldered. The re-soldered lamp has no 'play' to it when you squeeze it. It's solid and will never come apart.
|
|
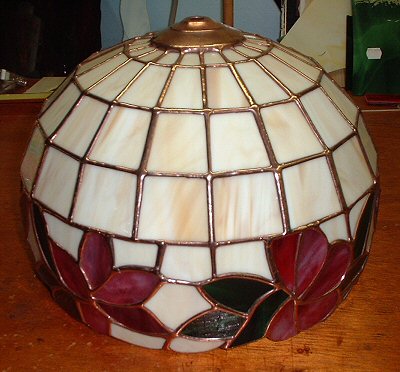
Finishing it Off We're at the home stretch now -- the rest of the work is purely aesthetical. We wash the lamp well to remove all the flux. If we don't wash it completely the flux will start to eat at the lead and leave behind a white, moldy residue that has to be scrubbed off using steel wool. Look for it on cheap lamps, especially on the underside that you normally don't see. If the residue sits like that too long you'll never be able to remove it. And even if it's on the underside it can come through to the top over time. Once we have all the flux removed we have a few choices. The lead is now silver in color. We can leave it like this or go over it with a chemical to color it. There's black, copper, brass and pewter finishes that we can use on it. I rarely leave my projects silver because unless it's a clear window or a Christmas design it just doesn't look finished. I almost always use the copper coloring which starts off very bright but within a month or so it dulls down and has a great look about it. It really finishes the lamp and matches the base that the lamp will sit on. After the coloring chemical is applied the lamp must be thoroughly washed again. If it isn't washed well you will find yet another moldy residue trying to consume your lamp.
|
|
A Final Word I've skipped a few basic but important steps in this tour of making a lamp and I've also managed to dodge all aspects of stained glass technique. We've skipped things like choosing glass, matching different glass types, paying attention to the grain of the glass, cutting and grinding efficiently, soldering techniques, finishing the inside of the lamp and doing the edges to name but a few. This page was only meant to show you the basics of making a stained glass lamp correctly. The process is not very difficult but it can be time consuming if you want to do it well. I hope this has helped you appreciate the work involved in Stained Glass and I also hope it educates you in what to look for when purchasing a stained glass lamp or window. Stained Glass has always carried a reputation of being expensive and it was for a reason. There are many, many steps to doing glass work and some of them can be omitted to make the process go faster or to help lower the production costs. The downside of this is that the finished piece will never be around in 30 years (or 10 for that matter).
|